
Get started using Lightroom Classic CC – Fast!
A Crash Course in Lightroom Classic CC
Get ready for the ultimate beginner’s guide to Lightroom Classic CC! And while I promise to get you up and editing your photos in a flash, there’s a lot to cover so you might want to go grab yourself a cuppa/glass/choccie and settle in 🙂
Already know what Lightroom is and want to jump in and get started?
Skip straight to the Lightroom Classic CC quick start guide
Lightroom can transform your images in a few simple clicks!


Why you need Lightroom?
Perhaps you’re wondering why you even need Lightroom in your life? After all who has time to learn yet another software? Trust me, if you love photography, you’ll LOVE Lightroom. Aside from being a beautifully simple way to edit your photos, it solves many other problems frequent snappers have.
I’m betting you’re just like me! You take so many photos that your phone, camera and computer are always filled to the brim! Pretty sunsets, nights out with friends, your kid’s funny faces, cute moments or hilarious first class tantrums and even the odd pretty cup of coffee in that gorgeous cafe where the light was just beautiful . . . . We’ve all done that right?
So. Many. Photos. Yet, it’s rare that you ever actually end up “doing” anything with them. Especially the ones you take on your camera that you can’t instantly share online! With these in particular it always seems too hard to organise, edit, share or print the winners. And even thinking of putting the “phone snaps” together with the “good camera” shots to create a yearly photo book . . . that’s the definition of the too hard basket right there!
This is why you need Lightroom, it’s not just a photo editor, it’s also a photo organiser, a cataloguing system and a great tool to create photo slide shows and photo books all in one!
With Lightroom you can:
- Quickly organise all your images from ALL your devices and cameras
- Add keywords to effectively catalogue your images so you can find what you need when you need it!
- Easily make pro level non-destructive edits to your photos. Non-destructive is key – you can play to your heart’s content and not worry that you will destroy the original image – the changes are effectively made like a removable filter over your photo. Once you like what you see, you can copy these edits to similar photos in one step, saving you hours!!
- If you shoot in raw, not jpeg,[link] it’s even more important to use a raw editor, like Lightroom to “finish off your images.
- You can also save your “recipes” you find you use over and over in presets, making it even more efficient to edit your images
- Lightroom makes it easy to print and share your images at just the right size for every purpose. Facebook, Instagram, a small print for Grandma.
- There’s even a slideshow and photo book creator built in.
Boom! What more do you need? 🙂
Is it hard to get started in Lightroom?
So you’re sold, but I’ll be you’ve heard Lightroom is hard. And it’s true, it can seem really confusing the first time you open it. But it doesn’t need to be. Working through step by step and focusing only on what you really need it’s actually pretty simple to get started.
Lightroom has 7 “modules”, but before you break out in a cold sweat, take note that 95% of the time you’re only going to need 2 of them. The “Library” & “Develop” modules. That’s it! For now, put a big mental cross through the rest.
![]()
The Library Module
Just as it sounds – this is where your photos live. It’s where yYou’ll import your images, organise and add keywords and also where you’ll export your images in the right format and size for your project.
The Develop Module
I like to call this the fun module, because hello – this is where you’ll edit your images and realise your creative vision. Everything from basic colour & exposure correction & sharpening to B&W conversions, removing “spots” or distracting objects, bringing back skies and funky effects.
Now you know you only need to know two modules, getting started in these is a snap!
Lightroom Classic CC Quick Start Guide
Let’s bust the myth that getting started in Lightroom can be tricky and overwhelming. It doesn’t need to be. I’ve put together four steps that will walk you through the key things you need to know to get started. Follow these and you’ll be off to a running start in no time.
Step One: Download and Set up
Step Two: Import photos
Step Three: Edit photos
Step Four: Export photos
Step One: Download and set up Lightroom Classic CC
Download
Lightroom Classic CC is available from Adobe. I recommend the Creative Cloud Photography Plan which gives you Lightroom and Photoshop for $14.29AUD or $9.95USD per months. Excellent value even if you never end up diving into photoshop! You’ll get access to the Lightroom desktop app for Mac and PC on up to two devices as well as companion apps like Lightroom mobile for smartphone and tablets.
Open & set up.
When you first open Lightroom Classic CC, you’ll be asked a few things. Don’t panic. It’s really easy. Breathe and follow these instructions.
Create a catalogue
Lightroom will ask you to create a new catalogue, this is simply where it’s going to store all the information about your photos. You can go with the default location and name, or choose your own. Don’t stress over it, the default location and name are perfectly fine.
Creating a catalogue is something you generally only have to do once.
Now it’s time for the fun part!
Step Two: Importing & Viewing images in Lightroom Classic CC
Importing your images
Once you’ve created your catalogue, you need to import images into Lightroom for you to edit. Even if your photos are already on your computer, Lightroom won’t be able to see them until you import them.
You can also import directly from your camera, phone or card and when you do this you’ll also be copying your images to your computer at the same time. Win win!
From your camera or card reader
Connect your camera or card to the computer and click on Import on the bottom left of the screen. You should see this screen with previews of the images you want to import.
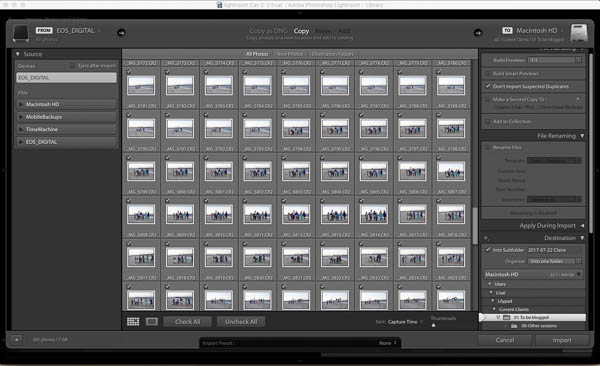
If you don’t, look at the folders under source on the left and make sure your card/camera is selected.
Before you start the import – check these settings below only and don’t worry about any others. Lightroom remembers your last import settings so you only need to do some of these things the first time you import!!
1. Make sure “copy” is selected at the top of your screen.

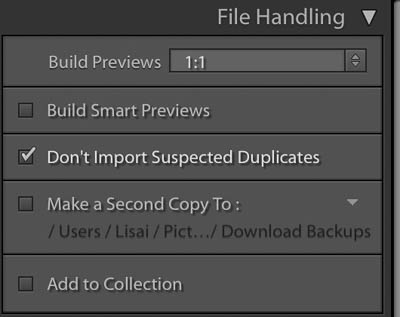
2. Set up file handling. Lightroom needs to build previews for your images and this can take time – and take up extra hard drive space on your computer. Choose one of the following
- 1:1 – if you plan to work on the images very soon – it will take some time but will save you hours later. This setting will also take up the most space on your hard drive.
- Minimal: If you just want to back up your phone or camera and won’t look at them for a while. This is the fastest option and takes up the least space on your hard drive.
You can also check the box “don’t import suspected duplicates”, this is especially handy when you download from a phone, camera or card that you haven’t deleted since last time.
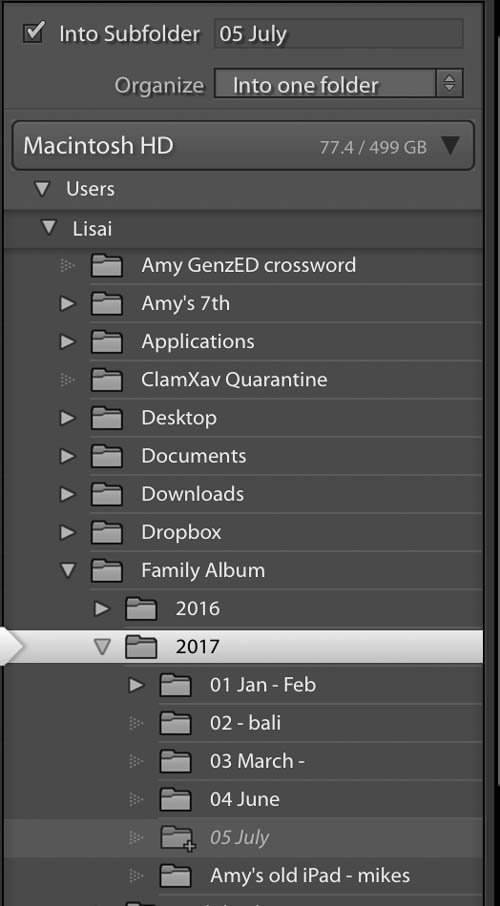
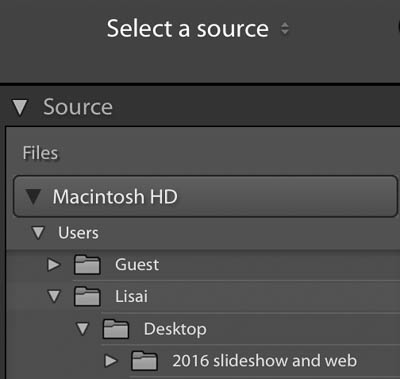
3. Choose a destination.
You need to tell Lightroom where to put your photos on your computer. This menu is showing you the files and folders on your computer. If you don’t have a folder structure set up for your photos yet, I recommend sorting them into folders by date or month. In the example below, I’m telling Lightroom to put them in the “2017” folder and create a subfolder for this lot called “05 July”. If you have a folder all set up on your computer, simply navigate to that folder and select it.
4. Choose which images to import.
Stay with the default select all or choose specific images by making sure they have a checkmark in the corner of the preview. Don’t try to pick your best images at this stage – that’s where Lightroom shines!
From your computer
To import images from already on your computer – it’s even easier!
- Navigate to the folder under “Source” on the left then follow step 2 above. You don’t need to choose a destination because they are already there!
Obviously there are loads of other settings you could use here – but for now, this is all you need to know.
You can now jump in and start processing your photos!
Viewing your photos!
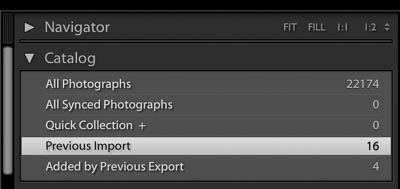
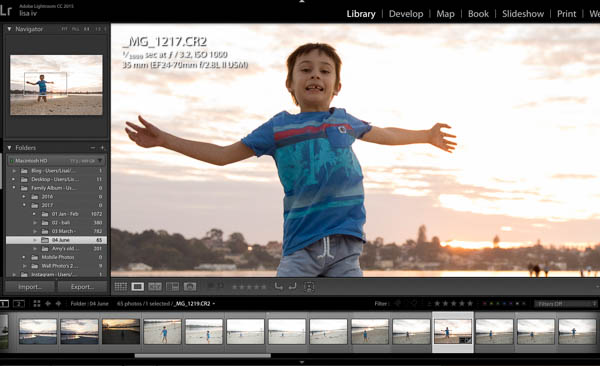
Once you’ve imported your images Lightroom sends you back to the library module, this is where you can easily sort and organise your photos, generally, you’ll be shown all the images you’ve just imported. On the top left panel under “Catalogue”, you’ll see highlighted what is being displayed.
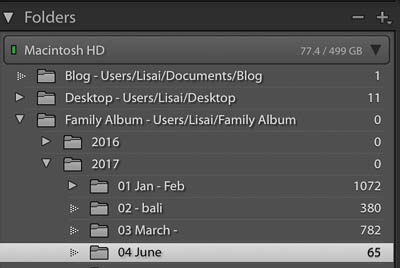
The next block down shows the folder view, just like your computers file browser. Navigate to the images you want to work on.
Now just spend a few minutes checking out the different display options. Click on all of these buttons under the image panel and see what happens – I find I learn better by just doing it 🙂

You’ll see to the left is the file browser, in the middle a photo, the bottom a film strip of your images with the selected image highlighted and to the right the quick develop panel.
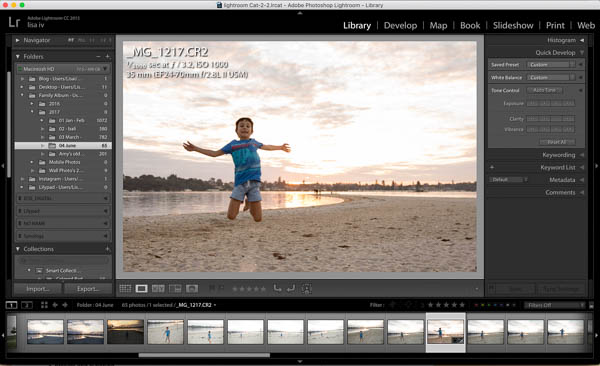
I recommend clicking on the arrow on the far right and hiding the quick develop panel. I prefer more real estate for the images 🙂

You can also zoom in to check details by pressing the spacebar or choosing 1:1 in the navigator top left.
You can do all sorts of fun things here like create collections add keywords and flag or rate images. However, this is the quick start guide, it’s time to pick an image and get playing!
Step Three: The develop module – Editing your images
Whoop Whoop – We made it to the fun stuff!!
Click on the develop module and your photo will now be in Lightrooms “digital dark room”. Here you’ll be able to crop, adjust colour and exposure, make b&w’s and do local or selective adjustments to just a part of the image including getting rid of unwanted objects.
The develop module of Lightroom is very powerful! To learn all that it has to offer is let’s face it, way way more than I can put in one blog post which is why I’m about to release my new Lightroom Classic CC Course, to walk you step by step through everything you need to know!
It is however really easy to get started and make simple adjustments that have A LOT of impact on your image.
Move to the Develop module by clicking “Develop” on the top right, and this is what you should see.
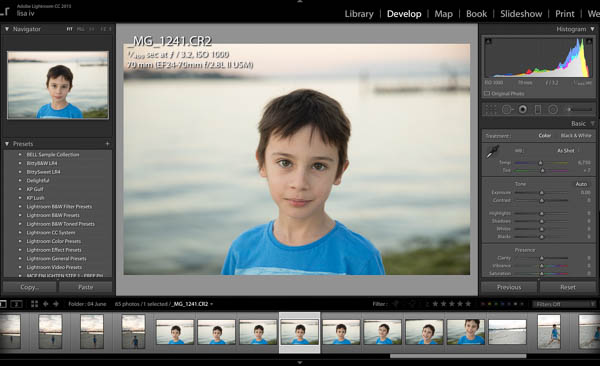
On the left is the navigator and presets, the bottom the film strip and on the right the tool pallets – where all the action happens! When editing an image I work from the top down through the tool pallets.
Straightening and cropping
I can’t take a straight photo to save myself so I always start with straightening and cropping my image Click on the crop symbol.
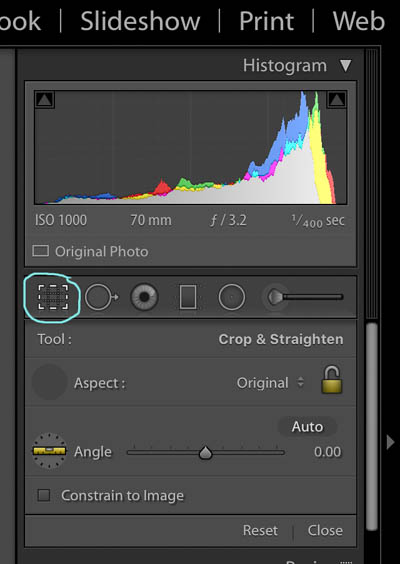
If there’s a horizon or obvious level point, choose the ruler and drag along exactly along the horizon of the image and just like magic, Lightroom will straighten your photo. You can then click and drag the corners of the crop marks to crop to your liking. In this image, I’ve cropped in a little.
Cose the cropping tool by clicking close at the bottom and move on to the basics panel.
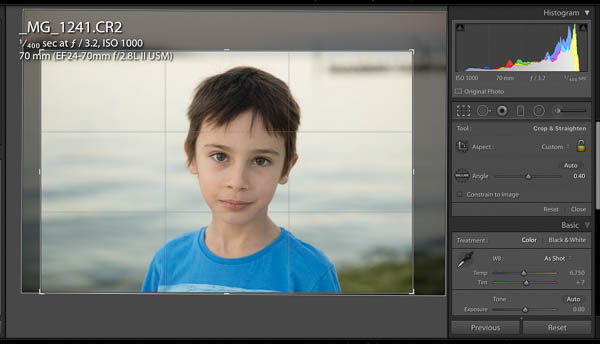
The Basics Panel
Here’s where the magic happens.
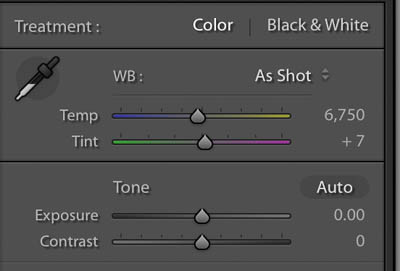
Follow the panel section in order, from top to bottom and have a play. Move the sliders back and forth and you’ll quickly learn what each slider does.
The first sliders adjust the white balance, that is, how warm or cool the colour tone of your image is.
The second section is the tone, these sliders adjust the exposure of various parts of the image. The first two affect ALL of the image, the last four only certain tonal ranges of the image. For example, the highlight slider lightens or darkens only the highlights (or bright bits) of the photo.
The last section is where you can change the saturation, vibrancy and the clarity (go ahead and drag out the clarity slider and watch your image go crazy).
Don’t forget, these changes are non-destructive!! This means if you accidentally turn Aunt Mavis bright red with crazy deep wrinkles. No problem! You can press reset at the bottom of the tool pallets and start all over again. If you only want to go back a few steps, Lightroom has you covered! On the left is the history panel detailing all the recent changes you’ve made, click by click. All you need to do is click on the last adjustment you want to keep.
That’s it – go have fun like a kid in a candy store – only better & guilt free!! All the changes you are making are stored in the Lightroom catalogue and your original image is not being changed in any way. So you can’t wreck the photo!
When you’re happy with the edits and changes you’ve made, it’s time to “export” the photo.
Step Four: Exporting images – Getting your photo’s out of Lightroom Classic CC
Exporting images in Lightroom is a little bit light using the “save as” function in other software. By exporting, you save a new copy of the image you’ve created, with all the edits, in the format and size you need.
You can export just one photo or a whole folder of photos making it a tip-top time saver – and who couldn’t do with saving time!
To export images, make sure you’re back in the library module, select the image or images you’d like to export and click “export” on the bottom left. The window below will pop up and you can input your “recipe” for the new file as well as choose a location for the new file(s) to be saved. Click “Export” and you’re done!
Wait. But what export settings should I use???
Well, it depends! The ideal settings (size, colour space, file type etc) will vary for every purpose. Facebook, Instagram, emailing, the web, prints of various sizes and different media will all have different optimal export settings.
Let’s start with simply saving a new copy of the image, with all the edits. These settings below will export a copy with all the edits and no other changes (the size will be the same, filename & type the same) and put it into a new folder called “processed”.
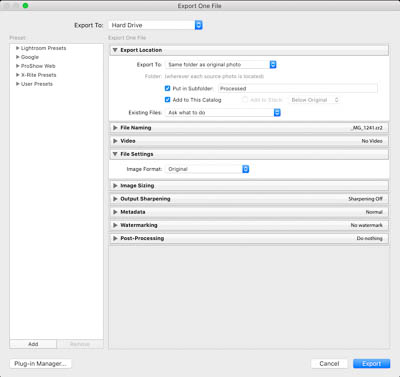
The good news is in Lightroom, you can set all these ideal settings up once and save them in the preset manager and you never have to think of them again. Ever!!

Clicking on the various presets under user presets will export an image with the exact settings you need with one click.
Want to know the right recipes that guarantee the best results for all the popular outputs – you can download my free Lightroom CC Export Presets! All the settings for all the popular outputs already done for you! Facebook, Instagram, popular print sizes, email, Photobook ready and more!! Easy to instal, and even simpler to export.
And we’re done! You’ve just had a crash course in Lightroom Classic CC you’re ready to rock and roll!
So what do I need to do again?
Step One: Download and Set up
Step Two: Import photos
Step Three: Edit photos
Step Four: Export photos
But wait there’s more!
As you can probably tell by now, this is just the tip of the iceberg when it comes to Lightroom, there is soo much good stuff in there I get dizzy just thinking about it.
What I’ve covered today will have you off and running, but if you’d like more in-depth knowledge of what Lightroom can do I’ll be announcing my Lightroom course very soon, where I’ll guide you step by step through all the goodness, including live walk throughs and exercises. No questions left unanswered. To be the first to hear about it and jump in with the super dooper opening offer – make sure your name is on the list on the waiting list so the carrier pigeon and dancing bears will be sent as soon doors open!
Some of the links in this post are affiliate links, however, be assured I only ever recommend products or services I personally use and love.


Facebook Comments