
The Top Four Lightroom Classic CC Edits
I’ve put together the top 4 Lightroom Classic CC quick edits you’ll use over and over and over! They might be small, but mastering these four fixes, will have a BIG impact on your photos!
I remember when I first started using Lightroom. I got the basics of Lightroom sorted. I managed to import a photo, checked out the library module and had a play with the develop module. Then I started to get really excited about the potential of what it could do. I even sort of “got” what each of the basic sliders did.
But actually processing an image so it looked good?
Not a chance.
If I’m honest, finding the right mix of adjustments seemed to elude me and most of my photos ended up looking like a cross between a 70’s cartoon strip and futuristic hologram!!
Eventually, I worked out the key was not trying to do everything at once. Instead, if I simply worked on fixing one or two problems with a photo at a time rather than jumping in and trying to take a photo from “zero” to “hero”.
So where to start? What top fixes or edits should you master first? I’ve got your back.
1 | Global Exposure fix in Lightroom Classic CC
Let me let you in on a little secret! Even professional photographers don’t always nail our exposure in camera. Say, for example, I’m shooting in natural light on a cloudy day and the sun comes out from behind a cloud, I might not adjust my exposure fast enough and end up with overexposed images. Or, my favourite stuff up, I bump a dial (yep, that happens) and it’s a few frames before I notice and I end up with an under exposed or over exposed image. A lot of the time, you can still save the image – and Lightroom is the business for fixing exposure in a snap.
Exposure issues are fixed easily in the basics panel using these five sliders – The best way to understand how these will work is to have a play, open an image and move take turns moving each slider to the far right and far left and watch what changes in your image.
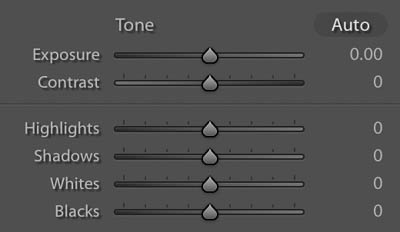
Exposure
This slider makes a global adjustment across the whole image brightening or darkening every part of the photo. It’s the best place to start. Slide it right to brighten and left to darken until the image mostly looks right.
Highlights
Next look at the brightest parts of the image, you can selectively lighten or darkened them with this slider.
Keep an eye on the photo – the aim is to bring in a little detail in the highlights if darkening or brighten to add contrast. Be like Goldilocks and aim for just right. Darken the highlights too much and you might “block it up” where it becomes a splodgy spot, too light and they might become white glowing splotches!
Shadows
The shadow slider will only affect the darkish parts of the image (not the blacks). Darkening shadows can add contrast and brightening shadows can bring some needed detail into the shadows. Just keep an eye on your image and make sure you’ve not gone too far either way, giving that weird comic book feel.
Whites
The whites slider is the opposite to the shadows, affecting only the lightish parts of the image. Just like the highlights you can go too far and end up with a splodgy looking image.
Blacks
The black slider is the opposite to the highlights slider and will adjust only the darkest parts of the image.
Again keep an eye on the photo, if you brighten these too much you can get a comic book effect, to dark and your photo will be very grungy!
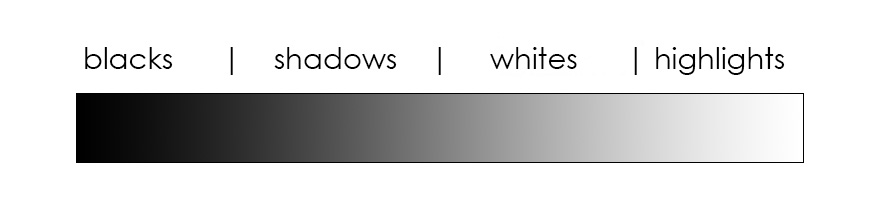
Another way to look at it is to imagine the image’s tones all split into four from lightest to darkest. It’s like a sliding scale.
You won’t always adjust all four and will often go back and forth tweaking each one and the overall exposure to get the right result for the photo, in less than a minute!


A few quick adjustments took this underexposed image to perfect!
2 | Fixing white balance in Lightroom Classic CC
White balance refers to the colour temperature or the warmth of an image. An image with the wrong colour temperature can look really off – fortunately, it’s easily fixed in Lightroom.

Cool

Neutral

Warm
The temp and tint sliders are the key tools for correcting exposure. These will look slightly different if you are working in raw or jpeg, and a raw image will be easier to correct, but the principle is the same.
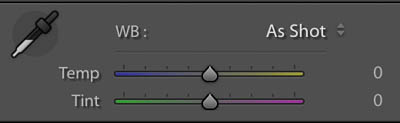
jpeg files will have “0” as the default settings
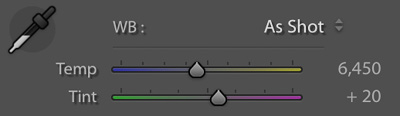
Raw files will show the exact white balance levels shot
Temp
Move to the right and the image becomes more yellow, to the left and more blue.
Tint
Move to the right and the image becomes more magenta (pink), to the left green.
The simple fix is to adjust the sliders until the image looks right to you. I often try Auto first – sometimes it’s perfect or much closer to what I want. Colour balance can also be selective, I often “warm up” images taken in cooler light.
“Quick tip” if you have a neutral part of your image you can select the eyedropper and click it on the neutral part and Lightroom will set the white balance. Use your judgement though, it can be affected by different lights and colour and not always work.

The image straight out of camera was too cool and green

Once the white balance is corrected the image has a much nicer feel.
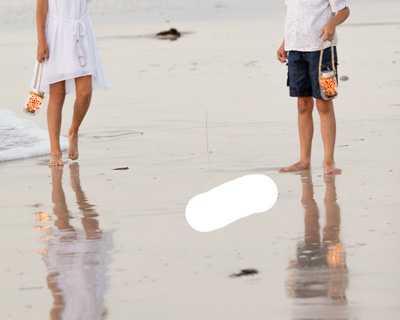
3 | Removing an object in Lightroom Classic CC
We’ve all taken great photos where we wish something wasn’t there! Maybe rubbish on the grass, a toy, or a dust spot in the sky from the lens. Heck, one of my favourite portrait locations has a sign right where people look best!!
The great news is, it’s really easy to remove objects in Lightroom – as long as you can choose an area that’s “clean” to copy from. Wait. What do you mean by “clean”??? Say for example you have a picture of your kids on the grass at the park, the stars aligned and they were all looking great in the one photo!! But, there was a chip packed on the grass too close to crop out. As long as you have a section of clean grass you can remove the chip packet with a few clicks in Lightroom.
Here’s what you need to do. Open up the tools palette and click on the Spot removal tool
Open up the tools palette and click on the Spot removal tool.

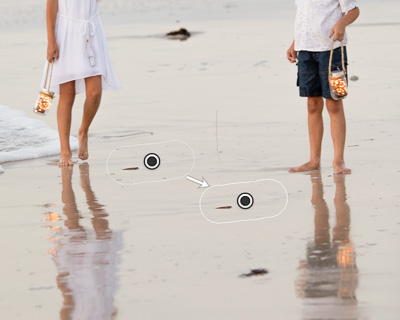
Go over to the object you want to remove and colour it in (you can adjust the brush size if that’s easier)
Lightroom will then “guess a clean spot to use to “remove the object. If it’s guessed wrong (like I think it did here, I don’t like how it’s chosen a spot with a small rock) you can simply move it to a better spot.
So I repositioned it to a cleaner spot.
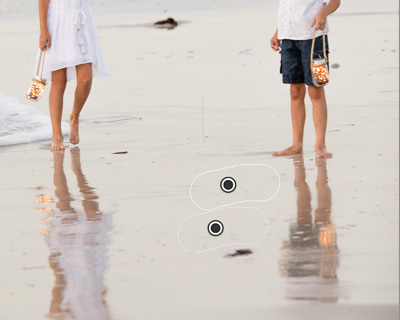
If you want, go crazy and get rid of all the big rocks and seaweed!


And that’s it. Unwanted objects removed!
If only decluttering my house was that simple . . .
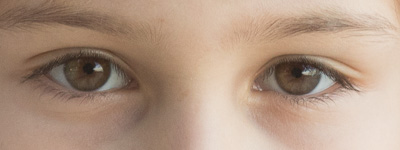
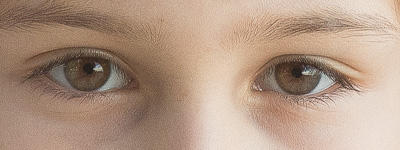
4 | Simple sharpening in Lightroom Classic CC
Lightroom is great for quickly sharpening your images. Before I sharpen, I like to make sure my image is zoomed into 100% so that I can keep an eye on “noise” levels (that grainy look), the more you sharpen, the more noise appears in an image.
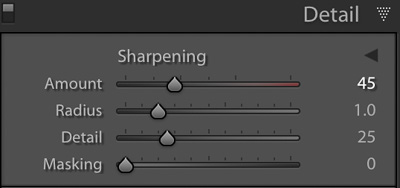
Sharpening is done in the “Detail Panel” and often the default setting is often pretty good. If you need to, you can boost it up a bit by moving the amount and the radius up little.
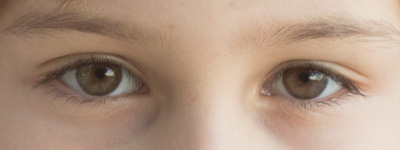
It’s hard to show online as various displays also change things, but you can see the difference here in this raw image, from unsharpened to sharpened.

While adding a little simple sharpening is easy, sharpening can be complicated and a little understanding of what’s happening can help you get the right results. I’ll be going into sharpening in an easy to understand way in my Lightroom course that’s due for release soon 🙂
For now, I recommend having a little play with sharpening, be gentle and gentle, keep an eye out for noise and pull back if needed. Less is often more when it comes to sharpening. Oversharpened images have that “overcooked” look. Like this weird patterned effect!
How does JPEG Vs RAW effect sharping?
A jpeg image will actually already have some sharpening applied in camera depending on your camera and jpeg settings. So it might not need much sharping in post. Whereas a raw image will not have any, almost all raw images will benefit from some sharpening.
Some of the links in this post are affiliate links, however, be assured I only ever recommend products or services I personally use and love.


Facebook Comments